Sunday, June 28, 2015

Bacon!

This is my last post as the June guest designer for SVG Cutting Files.  
July is just around the corner and my youngest child will be turning 13!  
He loves bacon... 
Seriously he would eat it ALL the time!  
And anything flavored bacon.  
So in thinking about his birthday card, of course bacon came to mind!  

For this card I used three files from SVG Cutting Files


I thought the oval card base looked like a fried egg :)  
I simply folded the bacon's arms around the cupcake!  

I know my son will love this card!  
Happy 13th birthday Kyle!

Thank you to SVG Cutting Files for the opportunity to be the guest designer for the month of June!

Sunday, June 21, 2015

Sugar Skull HTV, Vinyl, and Cardstock - SVG Cutting Files Guest Designer June

      It's my third week as the guest designer for SVG Cutting Files.  
This week I chose the sugar skull file.
  One of my best friends has had a rough week and I decided to 
surprise her with a gift to cheer her up!  
 I'm fairly new at HTV (Heat Transfer Vinyl) and this is my first time layering.  I love the glitter on a simple grey t-shirt.  Of course I forgot to mirror my image (a common mistake and necessity for any writing) which means to reverse the image since HTV cuts upside down.  
Thank goodness with an image such as the sugar skull, it doesn't matter!  
I especially love how the rose, with the top fine detailed layer, 
turned out with a bit of dimension and delicacy!   

      I also cut the sugar skull file using vinyl.  For both the HTV and vinyl I left off the back layer of the sugar skull, preferring for the color of the base to show through.  

      
        Lastly I cut the sugar skull out of cardstock and created a card using the nugget card - vertical file.   I also used the candy wrap die from Jaded Blossom.  I used a couple of pieces that would normally be thrown away from the cut outs of the sugar skull to decorate the card.  I added some Liquid Pearls and Stickles because a sugar skull needs some bling!
    
I hope you enjoyed seeing how versatile the files are at SVG Cutting files.  Not only was I able to make two gifts, 
I also made a beautiful card with a treat, all using the same file!  


Sunday, June 14, 2015

Chibi Uncle Sam from SVG Cutting Files

     As the guest designer for the month of June, it's my day to post at SVGCuttingFiles.com.  This week I'm feeling very patriotic and thinking about the 4th of July and celebration of our country and freedom.  I chose to use the Chibi Uncle Sam file and the Center Step Zig Zag Card Base.  I love the center step cards and the set of 7 is definitely a great deal!   


Recipe:
Card Stock: 
Red, Flesh, White, Black, Blues (Navy, Denim, and Light), 
Creative Memories Printed Star
Embellishments:
Stickles, Velum Sticker, White Gel Pen, Ink for antiquing


I'm always impressed with how well the Silhouette machine cuts such small details.  These stars are less than 1/8 of an inch and they cut perfectly.  I couldn't throw them out so I added them to the hat and his shirt.


I love the dimension the zig zag step card gives and well it stands up on it's own.  I added foam dots to the back of Uncle Sam so he stood out from the card.  

Hope this inspires you to make something patriotic!


Sunday, June 7, 2015

Kick Off! June Guest Designer at SVG Cutting Files - Daisy Stitch Up

      I am pleased to be the guest designer for SVG Cutting Files for the month of June.  I'll have a new project each weekend during the month.

     For this weeks project, I chose to use the Daisy Stitch Up file.  Several years ago, I took a class at a local scrapbook store.  The teacher was from England and she taught stitching card techniques.  I learned a lot about using beads, unique thread, and thinking outside of just following the outside edge of a pattern.  I created three very different projects using this file to showcase those three techniques.  


MONOCHROMATIC CARD     
     The first project using the Daisy Stitch Up file is a monochromatic card.  I used the SVG Cutting Files Curved Card Base.  I love the funky shape of this card!  I used black paper and a gray print I had in my stash.  I wanted a thick and metallic thread so I used a Madeira thick embroidery thread.  I also used this thread across the top of the card in a double bow.  For the sentiment I used a metal "grateful" tag.


 PINK THANK YOU TAG
     For my second project, I used the "thank you tag" file from the Silhouette Store.  I wanted something large.  I chose a pink print paper from my stash and hot pink and gray print paper for contrast.   For the Daisy Stitch Up, I used a Madeira silver metallic thread with several colors woven through it.  For the pattern, I used the top hole in each petal and worked my way down each side.  This file has a perfect hole size to use for chunky thread or yarn.  The hole size worked well for multiple stitches within one hole.  To finish it off I added a grosgrain black double bow to the top.


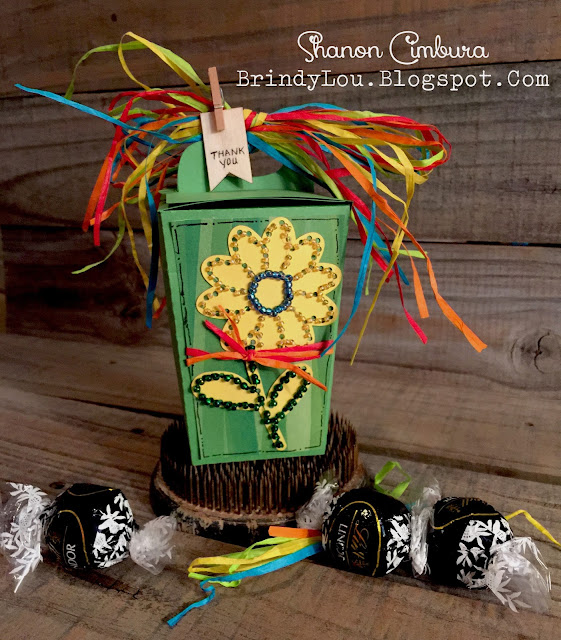
BEADED FLOWER ON BOX
     For my third project (my favorite!), I used the Tall Trapezoid Lock Box as the base using some Creative Memories papers from my stash in palm green and a complimenting grass print.  This file goes together so quickly and easily!  I used small glass beads and stitched in yellow around the petals, blue around the center, and green for the petals and stem.  The dimension and texture is beautiful and the beads just elevate this project to an elegant gift! I finished this off with some bright colored taffeta ribbon and a wood tag with "thank you" written on it and mini clothes pin. 


I hope you enjoyed these three projects and are inspired to try a stitching card design!  


Friday, June 5, 2015

T-shirt Thank You for Soccer Coach - HTV

As I continue to venture out in my crafting mediums, I tried HTV (Heat Transfer Vinyl) for the first time.  I used Siser Easy Weed and this is red glitter.  I found the file on a Facebook page for Silhouette users and I added wording to personalize the design.  This turned out to be a great Coaches gift after all the players signed the t-shirt.  I used an iron to apply the HTV and it went on so easy!  I like Siser glitter because it is small and very sparkly, yet it isn't "scratchy" to the touch.  

Thursday, June 4, 2015

If You Want To Know How Much I Love You Count The Waves In The Sea - Vinyl Wall

I found a cute set of paintings to hang in my bathroom over our garden tub.  After placing vinyl on our living room wall, I was game to try again.  I found this saying in the Silhouette store.  I liked how it used both negative and positive space for lettering.  I used matte black vinyl from Oracle.


The Road To Our Heart Is Paved With Paw Prints - Vinyl Wall

As a crafter, I enjoy working with all different mediums.  I purchased a metal print off Groupon and had it printed with a picture of our two "little girls".  I must admit that the true reason that I put up this vinyl is laziness lol  I hung the new print on the existing nail, not wanting to patch the hole and place a new nail in order to lower the print.  I found this design on the Silhouette store.  I did have a difficult time using Contact Paper as a transfer and lost a few paw prints.  I have since purchased "true" transfer paper and it is worth every penny!  My vinyl hint is to clean the wall well and let it dry.  I used water with a bit of dish soap and then wiped it again with water.  When applying the design, before removing the transfer paper, burnish - burnish - burnish (meaning go over and over and over) with a tennis ball to make your design stick well.  Then start at a corner and slowly remove the paper.  This is a matte black from Oracle vinyl.